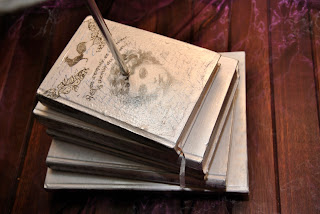
French vintage lamp complete with vintage image; made from salvaged books.
Another - "must do this" project done!
Giving old books a second opportunity by creating a vintage lamp:
 |
| Salvaged Books becomes a French Vintage book lamp |
What was used:
- 4 hardcover books - Salvaged from a bin destined for rubbish dump
- Salvaged Lamp base and lamp rod
- Salvaged lamp shade
- Paint
- Vintage girl image from the http://thegraphicsfairy.com/Random handwritten images
- Glue Gun and glue sticks
- Gel Medium
- Laser Printer
- Silver powder
- Drill and drill bits
- Wood Glue
- Inkjet printer
- Transparency film
- Standard Photocopy paper
The making process:
So right from the word go I knew I wanted the books painted; they were completely mismatched. (when it came to category or content, ranging from biography and sport to business.)
I also wanted them completely painted in white, I had no intention of sanding down to show the original cover colour again.
I roughly stacked them to see which I preferred at the bottom, top etc.
First step:
- To make sure the pages are stuck down, now I have seen some book projects where the makers glued each page literally page by page, this was not an option for me, time consuming and plus I wanted the ruffled page look.
I glued the first few pages in the back and front of the book (the paste-down, flyleaf plus a few extra pages) to ensure these don;t lift and then used whilst holding the book in one hand, applied ample amounts of white wood glue (cold glue) with a sponge brush to the fore-edge, tail and head of the book making sure that the glue runs in between the pages.
The books were then left to dry for a few hours.
Step 2: All the books were painted. During the painting process, specifically the fore-edge, tail and head, I deliberately did not cover everything, thereby ensuring some of the natural page colour still show. Once again left to dry - this time overnight.
Step 3:
I decided to use random handwriting on the book spines. I selected an image from my stash and then enlarged it to create large bold type.
I printed the enlarged image on a single A4 transparency film for laser printers using the inkjet printer. Then transferred the type to the spine.
Step 4:
The centre point of each book was marked, a hole was drilled through each individual book, the lamp rod will be thread through this later.
Step 5:
For the Front Cover I wanted to use a "mixed" image. I decided on a vintage image of a girl I sourced from the Graphics Fairy. I made my own French wording and used a french looking font and arched the type above the girl. For the background I used a handwritten letter image. Lastly random twirls and a french cock made it to the top of the page.
I printed the images on plain copy paper with the laser printer. Cut down to size and covered the front of the image with transfer medium. I did this in several layers, leaving a to dry in between. Once completely dry, the images were soaked in lukewarm soapy water. Starting with the combined girl image, the image was removed from the water placed face down on my worktable top and with my fingers I gently rubbed all the paper of the back. Transfer medium was painted on to the cover and the image was put into place over the wet medium. The same process was followed for the swirls image.
Step 6:
The lampshade just shouted out for a distressed look.
 I once again printed the same handwriting image I used for the spines, this time on standard copy paper. Gel Medium was painted onto the lampshade and the image was placed printed side down on the medium, this was left to dry following which I started removing the paper, as expected some of the paper stayed behind and had to be removed by slightly damping it and rubbing with finger tips.
For some reason the transfer took brilliantly to certain spots and zero to others, all I can think is that the lampshade might have had a waxy / oily blotches.
Nevertheless, I wanted distressed and that's where it was heading.
I finished the lampshade by rubbing silver powder into the shade and over the writing. (I used my fingers and hand for this process)
Lastly:
The books were glued together with the glue fun in the order I wanted. Meanwhile during one of the drying periods; the base, wiring and lamp rod were assembled. When the stack was dried, the lamp rod assembly was threaded through the holes and the lampshade and bulbs were fitted.
To add accent some of the silver powder was rubbed into the edges and sides of the books, and ...
Voila, Lampe terminé et magnifique pour apporter la lumière à votre vie..
I did not want it to be the same as all the other french white items found everywhere, wanted rough and distressed but full of character, turned out Exactly how I envisaged it !!


No comments:
Post a Comment